What is a Custom Pixel?
Shopify introduced a feature to allow users to manage their pixels, such as Google Analytics, Facebook, TikTok etc. This is due to the previous approach being somewhat difficult to work with due to the checkout being isolated. Javascript hacks, and rough and ready implementations were often seen when working with Shopify.
A Custom Pixel is loaded onto the checkout page, as well as the frontend of the site, and allows Shopify admins and developers to manage their pixels and events from one place, where previously there would have been a disparity between the FE and the checkout.
The idea is that you would have a Custom Pixel for each 3rd party that you are working with. You are able to collect the required data using Shopify Web Pixel API before passing this information to the 3rd party pixel script.
Although this approach is still quite technical, it does separate pixels from the main code base and theme code, which streamlines the process and allows developers to focus on developing, while pixel management can be dealt with elsewhere.
What is the Sandbox environment?
Shopify Custom Pixels use a secure sandbox environment. This means that the Custom Pixels are injected into the frontend of the site using iFrames. This approach means that the pixels will not interfere with the main website which reduces the chance of bugs being introduced when someone adds a pixel.
Custom Pixels vs Google Tag Manager
Shopify Custom Pixels work in a similar way to Google Tag Manager (GTM). In Shopify, a Pixel is the equivalent of a Tag in GTM. However, unlike GTM where you have an interface that allows you to manage the trigger for the Tag, Event Parameters and other such details, a Custom Pixel is more hands on in terms of coding this to work as you would like. This adds a level of complexity to managing pixels in Shopify as you are required to know basic Javascript and understand API documentation.
One approach is to combine both of the platforms. By creating a Custom Pixel for GTM, you can pass data from Shopify to GTM’s dataLayer and then deal with everything within GTM. This approach is often preferred for people that have already got a GTM container configured with tags they need for their website.
GTM Preview Mode and Sandbox Limitations
Due to the Sandbox approach that Shopify has adopted for the implementation of Custom Pixels, GTM preview mode will not work as expected. Preview mode expects the GTM snippet to be in the main DOM of the site, and not to be within an iFrame.
The GTM snippet can be added to the theme.liquid file to get access to Preview Mode, however, events that fire within the sandbox will not be visible in GTM unless they are pushed back up to the parent window. Doing this means that preview work does work more traditionally for all page apart from the checkout page.
There are other limitations to Pixels due to the Sandbox approach which can be seen here: https://help.shopify.com/en/manual/promoting-marketing/pixels/overview#pixels-sandbox-limitations
Why should you use Custom Pixels?
Although Custom Pixels is not a perfect approach, it does provide a way of capturing the checkout activity within the isolated Shopify checkout. Something that was difficult to do before Checkout Extensibility was introduced. With this in mind, Custom Pixels are the only sure way to monitor events on the checkout.
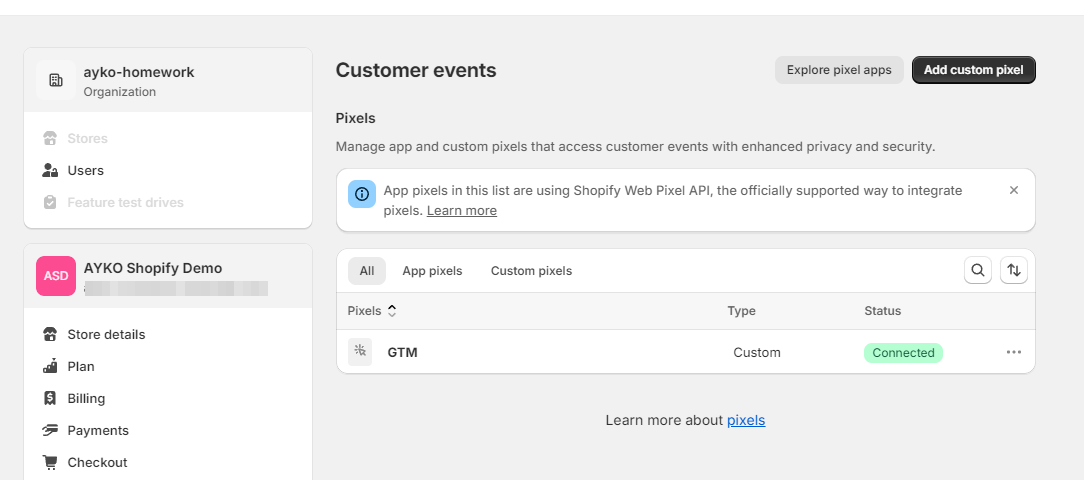
A Beginners Guide To Setting Up a Custom Pixel
The first step is to log in to your Shopify admin, navigation to preferences and then “Customer events” in the sidebar.
Once you are here, you can click “Add custom pixel”
The first thing to do here is add the GTM snippet that would traditionally put in the <head> of your website. However, remove the <script> tags
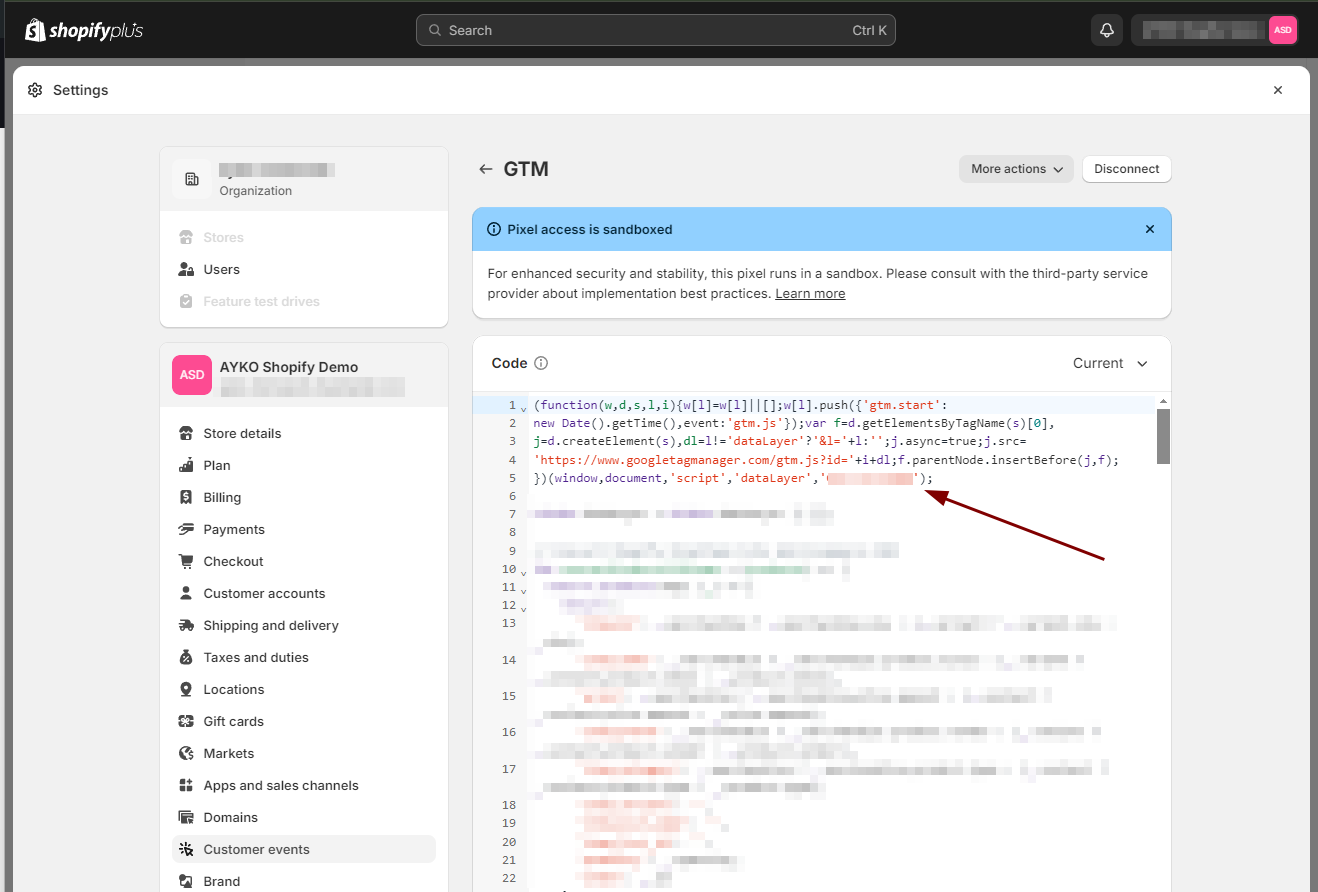
From here, we can start building out the events using the Shopify Web Pixel API and then push that to the dataLayer
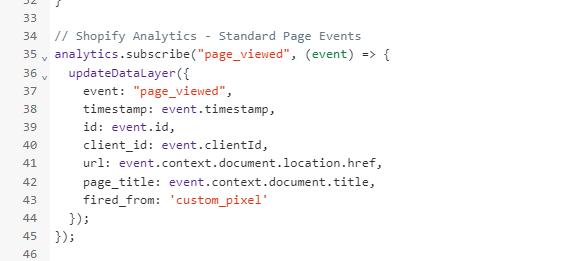
Once information is in the dataLayer, it can be consumed by GTM.
Here are a few Chrome extensions that will help us to see this data:
- [DEPRECATED] Tag Assistant Legacy Chrome Extension.
- Google Analytics Debugger
- TagHound - Analytics/GTM/Pixel Debugger
Advanced Custom Pixel Configuration
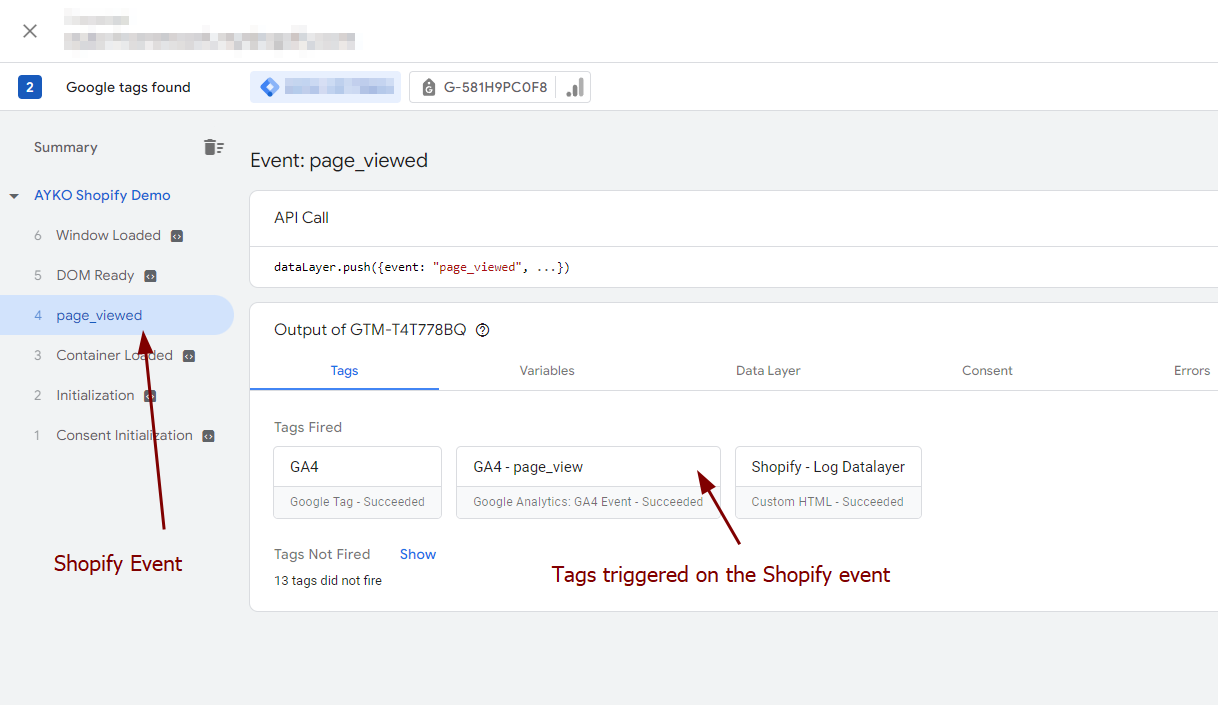
At B2 we are able to set up an advanced Custom Pixel configuration that allows Shopify events to be visible in Google Tag Manager. This also allows preview mode to function as normal (apart from Checkout.
You can see an example of that here:
Reach out if you would like us to help with your Shopify Custom Pixel integration via our contact page! https://www.b2agency.com/contact-us